Thanks for taking the time to look at my pictures and letting me know what you think. I was thinking that the wider arches looked the best and it appears that most of you agree.
Art


|
|
Thanks for taking the time to look at my pictures and letting me know what you think. I was thinking that the wider arches looked the best and it appears that most of you agree.
Art
Grandson Cody and I ran wires to the switches on the outside loop tonight next project is running the power for the second loop and then we will have 2 operating loops....hopefully by next weekend.
Working on my stone arch bridge and trying to decide on the shape of the arches. A friend made me some elliptical patterns and I cut what I felt was the most promising one out of cardboard to compare it to the first trial. The first one was just using a 4" hole saw for the top of the arch.
Which do you think looks better? What should I do differently?
Art


I vote for the elliptical arches.
Tough call, Art...both look really good, but I will go against the popular vote and choose the first one. I think I like the fact it will contain more stonework with the narrower arches. You can't go wrong with either design, however.
Rick
There is something to be said for both styles of arch. After thinking further about my vote for the eliptical arch, another reason for my preference was that the spaces between the uprights are further apart and show more of what is behind the bridge.
Randy - Thanks for your comment and opinion. That is a good point about exposing more of the scenery under and behind the bridge. By the way, I love your creativity on your logo, nice job!
Art
Randy - Thanks for your comment and opinion. That is a good point about exposing more of the scenery under and behind the bridge. By the way, I love your creativity on your logo, nice job!
Art
Art:
Thank you for the kind compliment. The logo is my feeble attempt at computer art. My son, Chris, has a friend at school who is a real artist and, in his spare time, is cleaning up the logo.
Randy
Since my last post, I've built a real stone portal for my trolly line where it enters the underside of Mt. Randolph. I've also used real stone for the hillside that runs along side the trolly line decending from track level of the Mountain Division. The trolly line is entirely elevated on the layout, making for a second level to my Free State Junction Railway which runs above the fictitious town of Patsburg. The east end of the trolly line terminates at a bumper on the inside of the underside of Mt. Randolph. The west side of the trolly line will terminate at Patsburg Westend, a shopping district.
Having the trolly line run inside of Mt. Randolph alludes to the interurban days. i use an Atlas O trolly. ( See accomp. photos )
I used real rocks which I got out of a nearby river bed. I glued the rocks together using Sinbad glue ( great stuff !! ) which I picked up at York. Using Sinbad to glue the rocks together insures there will be no rock slides. ![]()
The top rock over the portal is a long sort of "slab" rock, which fit quite nicely into the space. The portal does not look at all like any "classic" portal, which from my standpoint is pretty cool. As I planned my layout, I did not want to have all of one kind of portal. I want to give visitors the impression that the railroad was constructed over a period of many decades so different kinds of stone, materials, and cuts were employed. At present there are a total of 8 portals on the layout and I use 6 different kinds of portals .... one MTH single portal ( heavily weathered ) for the east portal of Mt. Randolph on the Mountain Division, a Scenic Express wooden portal ( also weathered ) on the west end of Mt. Randolph. For the double track main lines on the bottom deck of my layout I use 3 K line double track portals, an MTH double track portal ... which I had to widen a bit and cut the top higher to accommodate GG1 panagraphs... and a unique looking single portal that I purchased at a local train show.
I hope you enjoy the accompanying photos showing the rock hill, portal, a view of all 3 layout levels, and a Y6 taking the bridge.


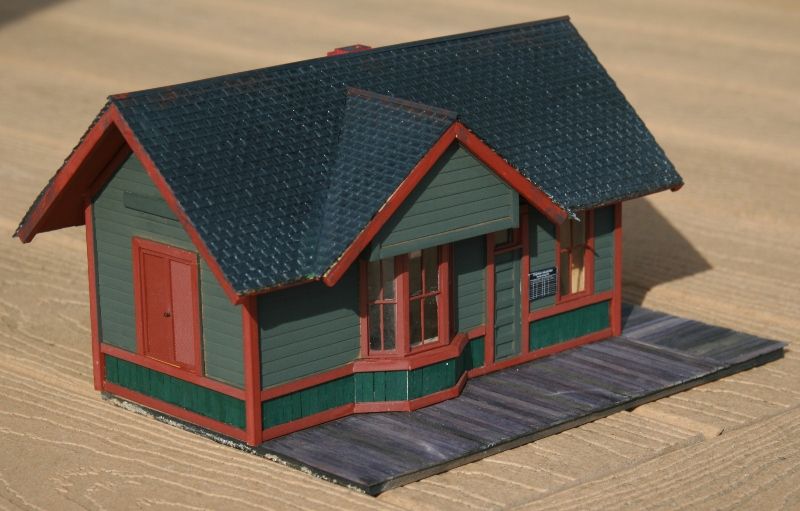
Completed a depot repaint and re-detail I've been wanting to do for a very long time. You can even read the writing on the bulletin chalkboard if you break out a magnifying glass...
Working on my stone arch bridge and trying to decide on the shape of the arches. A friend made me some elliptical patterns and I cut what I felt was the most promising one out of cardboard to compare it to the first trial. The first one was just using a 4" hole saw for the top of the arch.
Which do you think looks better? What should I do differently?
Art
I was busy today. I decided today that before I start on the upper part of my tunnel/mountain I needed to paint the wall in the room blue for sky. also I wanted to finally attach the tunel portals I worked on over the weekend so I did that tonight also. so here is a layout update of sorts. I also ordered a few things in the past few days I ordered 2 sc1 switch controllers and a station with 3 platforms 2 at almost 12 inchs and one at 24 inches.


are you doing clouds? I thought of doing them on my walls and putting those glow in the dark stars for at night to give an effect! You have a very nice setup. have fun!
chris
Completed a depot repaint and re-detail I've been wanting to do for a very long time. You can even read the writing on the bulletin chalkboard if you break out a magnifying glass...
Thanks!
I also have a few new structures, including two single-story farm houses, a water tower and some small sheds.
My layout only exists on paper, I'm waiting for a pal of mine who's offered to help me with my benchwork (I'm going to be building it in sections, so it can be broken down and transported if I ever have to move) for a time he can break out the saws. I have my track plan and am also currently buying up more On30 flex track.
Since my last post, I've built a real stone portal for my trolly line where it enters the underside of Mt. Randolph. I've also used real stone for the hillside that runs along side the trolly line decending from track level of the Mountain Division. The trolly line is entirely elevated on the layout, making for a second level to my Free State Junction Railway which runs above the fictitious town of Patsburg. The east end of the trolly line terminates at a bumper on the inside of the underside of Mt. Randolph. The west side of the trolly line will terminate at Patsburg Westend, a shopping district.
Having the trolly line run inside of Mt. Randolph alludes to the interurban days. i use an Atlas O trolly. ( See accomp. photos )
I used real rocks which I got out of a nearby river bed. I glued the rocks together using Sinbad glue ( great stuff !! ) which I picked up at York. Using Sinbad to glue the rocks together insures there will be no rock slides. ![]()
The top rock over the portal is a long sort of "slab" rock, which fit quite nicely into the space. The portal does not look at all like any "classic" portal, which from my standpoint is pretty cool. As I planned my layout, I did not want to have all of one kind of portal. I want to give visitors the impression that the railroad was constructed over a period of many decades so different kinds of stone, materials, and cuts were employed. At present there are a total of 8 portals on the layout and I use 6 different kinds of portals .... one MTH single portal ( heavily weathered ) for the east portal of Mt. Randolph on the Mountain Division, a Scenic Express wooden portal ( also weathered ) on the west end of Mt. Randolph. For the double track main lines on the bottom deck of my layout I use 3 K line double track portals, an MTH double track portal ... which I had to widen a bit and cut the top higher to accommodate GG1 panagraphs... and a unique looking single portal that I purchased at a local train show.
I hope you enjoy the accompanying photos showing the rock hill, portal, a view of all 3 layout levels, and a Y6 taking the bridge.
Finally started to work on the layout again. Working with pink board to fill in an open corner of the layout between the two levels.............Paul
Here is a short video clip of a Railking Y6 leading a coal trains across a Bollman bridge.

Since my last post, I've built a real stone portal for my trolly line where it enters the underside of Mt. Randolph. I've also used real stone for the hillside that runs along side the trolly line decending from track level of the Mountain Division. The trolly line is entirely elevated on the layout, making for a second level to my Free State Junction Railway which runs above the fictitious town of Patsburg. The east end of the trolly line terminates at a bumper on the inside of the underside of Mt. Randolph. The west side of the trolly line will terminate at Patsburg Westend, a shopping district.
Having the trolly line run inside of Mt. Randolph alludes to the interurban days. i use an Atlas O trolly. ( See accomp. photos )
I used real rocks which I got out of a nearby river bed. I glued the rocks together using Sinbad glue ( great stuff !! ) which I picked up at York. Using Sinbad to glue the rocks together insures there will be no rock slides. ![]()
The top rock over the portal is a long sort of "slab" rock, which fit quite nicely into the space. The portal does not look at all like any "classic" portal, which from my standpoint is pretty cool. As I planned my layout, I did not want to have all of one kind of portal. I want to give visitors the impression that the railroad was constructed over a period of many decades so different kinds of stone, materials, and cuts were employed. At present there are a total of 8 portals on the layout and I use 6 different kinds of portals .... one MTH single portal ( heavily weathered ) for the east portal of Mt. Randolph on the Mountain Division, a Scenic Express wooden portal ( also weathered ) on the west end of Mt. Randolph. For the double track main lines on the bottom deck of my layout I use 3 K line double track portals, an MTH double track portal ... which I had to widen a bit and cut the top higher to accommodate GG1 panagraphs... and a unique looking single portal that I purchased at a local train show.
I hope you enjoy the accompanying photos showing the rock hill, portal, a view of all 3 layout levels, and a Y6 taking the bridge.
Completed a depot repaint and re-detail I've been wanting to do for a very long time. You can even read the writing on the bulletin chalkboard if you break out a magnifying glass...
Thanks!
I also have a few new structures, including two single-story farm houses, a water tower and some small sheds.
My layout only exists on paper, I'm waiting for a pal of mine who's offered to help me with my benchwork (I'm going to be building it in sections, so it can be broken down and transported if I ever have to move) for a time he can break out the saws. I have my track plan and am also currently buying up more On30 flex track.
I was busy today. I decided today that before I start on the upper part of my tunnel/mountain I needed to paint the wall in the room blue for sky. also I wanted to finally attach the tunel portals I worked on over the weekend so I did that tonight also. so here is a layout update of sorts. I also ordered a few things in the past few days I ordered 2 sc1 switch controllers and a station with 3 platforms 2 at almost 12 inchs and one at 24 inches.
an MTH double track portal ... which I had to widen a bit and cut the top higher to accommodate GG1 panagraphs...
Nice work! Can we see that MTH portal? Cutting one up also.
Working on my stone arch bridge and trying to decide on the shape of the arches. A friend made me some elliptical patterns and I cut what I felt was the most promising one out of cardboard to compare it to the first trial. The first one was just using a 4" hole saw for the top of the arch.
Which do you think looks better? What should I do differently?
Art
Art, have to agree with the others. The wider arch mock-up looks better and they will allow for great views of the scenicing after you are done.
I was busy today. I decided today that before I start on the upper part of my tunnel/mountain I needed to paint the wall in the room blue for sky. also I wanted to finally attach the tunel portals I worked on over the weekend so I did that tonight also. so here is a layout update of sorts. I also ordered a few things in the past few days I ordered 2 sc1 switch controllers and a station with 3 platforms 2 at almost 12 inchs and one at 24 inches.
Well, it finally rained in sunny California enough to keep me inside for the day. So I wired up five accessories that have been waiting patiently. Had help from my twin grandsons after their school too. Nice to have them here to learn.
Will post photos some day…
jeff
Originally Posted by Lima: Hi Lima... Thanks for your compliment.
Here is a photo of the MTH portal as per your request. It sort of has the look of the prototypical raised tunnels that major railroads are making today ... to accommodate double stack containers.
Although it is not a pretty customized portal, it does the job of allowing GG1 panagraphs to be fully raised as they pass through the tunnel.... and it is not located in an area of my layout that directly meets the viewers eye.
I cut into the top of the portal using my own version of a hot knife..... a candle flame and old steak knife. i held the steak knife over the flame until it got good and hot. once hot enough I cut into the plastic. I had to do several repetitions before I got the desired outcome as you see in the photo.
When i got the upper part cut, I spray painted the top with flat black paint. This gives the effect that this portal has swallowed decades of steam locos. I'm not at all finished scenicing this area. As I continue to do so I plan to put a black interior inside the tunnel.
Thanks for asking about this portal. Like I said its not pretty but it is effective. ![]()
Actually I misspoke in regard to having to widen the portal. It is wide enough to accommodate all rolling stock and locos. The reason for employing the double portal at this very location is that this portal lies at the very end of a 42 inch radius curve .... thus must accommodate the excessive overhang of my full scale Lionel J class when it backs up out of the tunnel.
This portal is located on the mainline of my Free State Junction Railway, taking the mainline underneath Patsburg Westend. At the opposite I have a K line double portal ... which is installed on a 3/4 inch base on either side thus raising the entire portal enough to allow the panagraph to come through the tunnel. The K line portal is actually located right on the curve and accomodates the overhang of my 20 inch passenger cars
an MTH double track portal ... which I had to widen a bit and cut the top higher to accommodate GG1 panagraphs...
Nice work! Can we see that MTH portal? Cutting one up also.


Started making a cliff area.


Love the canyon shots above! Nice work!
Bryan,
That looks really good. What did you use?
I like what you're doing with the stone retaining walls to stagger the tunnel entrances. I did something similar:


Bryan,
That looks really good. What did you use?
Thanks Mike,
I used the cardboard lattice technique for the form. First coat was paper towels dipped into mixture of water and drywall mud. The first coat was mixed at a soup like consistency. Let dry for 2 days. The second coat was another layer of paper towels with drywall mud but more of a cake batter consistency. This layer I did more shaping of the mud. Painting was just water downed paint using a spray bottle. The pipe was just left over copper pipe spray painted. Darkened the cliff so it looks like dirty water runoff.
Today I finished hot melting the pink board in place and started putting on the plaster wrap. It felt good to be working on the layout again...........................Paul
I ran trains! ![]()
Tested out a new (to me) MTH NYC ESE Hudson. The silver painted Scullin disc wheels add great visual effect!
I played with my new band saw and started cutting the walls for my parking garage. I am using a Korber power plant office kit as the basis. Will post pictures tomorrow.
Art
I like the look of that the guy on the wall different style blocks I like it
I like what you're doing with the stone retaining walls to stagger the tunnel entrances. I did something similar:
Started making a cliff area.
Bryan:
This is nice rock work. What did you use and how did you do it?
Randy,
Thanks for the compliment. I used the cardboard lattice technique for the form. First coat was paper towels dipped into mixture of water and drywall mud. The first coat was mixed at a soup like consistency. Let dry for 2 days. The second coat was another layer of paper towels with drywall mud but more of a cake batter consistency. This layer I did more shaping of the mud. Painting was just water downed paint using a spray bottle. The pipe was just left over copper pipe spray painted. Darkened the cliff so it looks like dirty water runoff.
This weekend I plan on adding a little moss to some of the rocks and start on the bottom of the gorge. I really need to get this part done so I can install the wooden trestle that will span the gorge area. Already built the bents just need to get ground level done in order to put it up. Also plan on having a lake at the bottom of the area.
Bryan,
That looks really good. What did you use?
Thanks Mike,
I used the cardboard lattice technique for the form. First coat was paper towels dipped into mixture of water and drywall mud. The first coat was mixed at a soup like consistency. Let dry for 2 days. The second coat was another layer of paper towels with drywall mud but more of a cake batter consistency. This layer I did more shaping of the mud. Painting was just water downed paint using a spray bottle. The pipe was just left over copper pipe spray painted. Darkened the cliff so it looks like dirty water runoff.
Wiring and repair...
Yesterday I finally started the Rock Ledge on the face of my tunnel.
1st attempt at doing this.
I used DEP Lightweight Pre-Mix and I am very happy with the results.
Goes on Pink, dries White.
Tested it this morning and it is hard as a ROCK !!
Now on to the top of the mountain.
I just ordered a roll of "Shaper Sheet" from woodland scenics. It looks REAL easy to use for the mountain form. I am going to wait till it arrives and see for myself. Keep you all posted on that.
I have a ?
Do I have to use Acrylic Paint for the inside of the tunnels ?
I am going to be applying it directly over the foam boards I used for the rock face and mountain bottom supports.
Any ideas are good ideas.
Thanks in advance.


Access to this requires an OGR Forum Supporting Membership


