
Hi all- busy day out in the yard yesterday (not the rail type either ). Thanks for all the likes and comments on the new box cars.

Johan- that scene is amazing. The perspective on the building flats give it great depth. Somebody better get that guy down off the wall before he falls

Mark- Love the CC. I thought about doing in around my basement but my ceiling height is just about 7'. I'd have the same problem as you. I particularly like that #23 Geep.

Mike- What's wrong with wiring??????

Paul- The layout is coming together. Hope you find your power issues.

James- great shot. The lighting is perfect.

Roman- looks great. Gotta get my 2026 some run time soon.

Keith- looks like your grandson has everything under control.

Elliot- thanks for the info on rail color.

Happy Mothers Day to all the Mom's in our lives!

Bob

JamesRx, wonderful Photo! You really bring things to life! Nice work!

Mark, either way I still thinks it very cool! Maybe one day I will do one around the garage celling!

Roman, Fun looking layout, I bet all the neighborhood kids want to come in the garage and see it!

Elliot, thanks again, I guess I am going to have to get a couple different colors and see what I like best! When you thin it down do you just use water 1 to 1?

Bob, wiring is my down fall! That's why I don't like it that much. If you only knew how many LED's I have burnt out! LOL The good thing is most of them have been free!

Well I will get some work done today in the train room, not sure how much but will let you all know by the end of the day! 

I sure hope everyone has a wonderful Mothers Day!

myles posted:

Does anyone out there know how to load the locomotives found from the (MTH) TIU, to all my handhelds (4 in this case).  Without taking each handheld separately and ''finding'' each loco all over again.    I'm sure I heard, or read somewhere, that you can plug a tethered cable from the TIU tothe remote hand controller and it will transfer the info to it.  Thanks for your help!     

Myles Elliot is correct wrong section but in short the answer is to do a backup and then restore into the other remotes.

It is in Barry's Book which is worth every penny.

Curtis

paul 2 posted:

Mark, I like the overhead trains. Nice string of reefers. 

Johan, again nice weathering and good shots of the layout. With the information you gave me I may have located that boxcar but have to wait till Tuesday to call them to see if their list is up to date. And what are the dimensions of the layout.

So today after spending most of the day outside I decided to work on the layout before dinner. I tried a different engine and it went through the crossover with no problem. Then I put the lift out section in place and wired up one of the plugs so the lift out has power. I had added gar graves connectors to the tracks so when I dropped in the liftout section the tracks would line up better. Then I powered up the track. I got the engine to run through the section but after it got past the lift out it stopped dead. After taking the engine off the track I powered up again and with a tester found I had 17 volts all the way to the last section of tracks I did over the gorge. I placed the engine at that end and it started to run but stopped after a few feet. So now I have to figure what is up there plus I have to figure how I can clean the track under the stairs. Pics............Paul 2

DSCN0577DSCN0578DSCN0579DSCN0580DSCN0581DSCN0582DSCN0583DSCN0584DSCN0585DSCN0586DSCN0587DSCN0588

Paul. Thanks. The dimensions of the layout are 15.5 x 19.5.

Johan

mike g. posted:

Bob, the State of Maine cars look very nice ! Congratulation! 

Keith Looks like a good time! Enjoy it as much as you can!

Mark the celling RR looks great! I wish the CEO here would let me put on in the house, but I am reminded that's what the train room is for! LOL

Johan, that sure is a great photo! I have to ask, it the guy on the wall a worker or a trespasser ? LOL

Elliot, thank you sir I really like the second picture. I am glad I didn't buy the dark brown paint! LOL

Paul 2, Thing are really looking good at your place! I sure hope you can find the little gremlin running around your layout down there!

So as for me after working at the store this morning, I came home and worked on getting my toggle switches wired for my TSM's so far so go, they are all working like they should! I have 4 more to do in the morning, then I can switch to working on a cliff wall! Sorry no pictures today as I know everyone loves to see wiring! LOL

I sure hope everyone has a great Sunday!

Mike. Thank you. I think the guy is a trespasser, but where is a railroad police? 

Johan

RSJB18 posted:

Hi all- busy day out in the yard yesterday (not the rail type either ). Thanks for all the likes and comments on the new box cars.

Johan- that scene is amazing. The perspective on the building flats give it great depth. Somebody better get that guy down off the wall before he falls

Mark- Love the CC. I thought about doing in around my basement but my ceiling height is just about 7'. I'd have the same problem as you. I particularly like that #23 Geep.

Mike- What's wrong with wiring??????

Paul- The layout is coming together. Hope you find your power issues.

James- great shot. The lighting is perfect.

Roman- looks great. Gotta get my 2026 some run time soon.

Keith- looks like your grandson has everything under control.

Elliot- thanks for the info on rail color.

Happy Mothers Day to all the Mom's in our lives!

Bob

Bob. Thanks. That is a just one idea, added some detailing around the layout. 

Johan

Last edited by BAR GP7 #63

Mike, I can't tell you the exact amount of water to thin the paint with. What you are looking for is a thin enough mix that will go through the air brush. As I said before, something close to the consistency of cream. Be careful not to over thin it. One of my better tricks, is to use a turkey baster to transfer the paint from the can to the air brush jar.

Last night I ran trains before turning in.  While doing so I changed out the consist of the train running on the Mountain Division removing the two gons of rocks ( which have been running for a couple months now ) and replacing with a B&O livestock car, a flat car loaded with heavy timber, and a B&O bobber caboose.  As the loco ( Dockside ) the flat with heavy timber and bobber are pieces that I've already weathered,   I realized that the B&O livestock car can use some weathering.   It has now moved to the top of my " rolling stock to be weathered " list. 

Just watching em run, I totally enjoyed the time!  

As I've got a long list of non train related things to do today,  I hope to get a little bit of train time in at some point today, as it is a rainy day here in  Maryland. 

Here's the newest member of my B&O roster: GP9 #6463. It's purely a dummy unit at this point although I may add cab figures and headlight(s) later. I had a nice RK GP9 body and the rest of it - chassis, trucks, pilots, couplers, fuel tank are all cobbled together from junk I had laying around. I used a generous amount of dullcoat to give the blue paint that faded look. 

This is 98% complete. I will probably do some additional weathering and tweaking before I'm completely done. I used Williams pilots which means they have zero detail so I may upgrade them whenever I stumble across something nicer.

BO GP30 New GP9_20190512_111631371

BO GP9 6463 20190512_112426BO GP9 6463_20190512_111656258

Attachments

Images (3)
  • BO GP9 6463 20190512_112426
  • BO GP30 New GP9_20190512_111631371
  • BO GP9 6463_20190512_111656258

Ralph M. The whole vista has a nice, clean, cheerful feel to it, somewhere nice to go to play, have fun, and be happy. Those positives are consistent throughout what we can see there, so I imagine that is your personality coming thru. Congratulations on such a successful presentation of our hobby for yourself and anybody lucky enough to be invited to see your treasure there.

FrankM

Last edited by Moonson
Ralph M posted:

Here's the newest member of my B&O roster: GP9 #6463. It's purely a dummy unit at this point although I may add cab figures and headlight(s) later. I had a nice RK GP9 body and the rest of it - chassis, trucks, pilots, couplers, fuel tank are all cobbled together from junk I had laying around. I used a generous amount of dullcoat to give the blue paint that faded look. 

This is 98% complete. I will probably do some additional weathering and tweaking before I'm completely done. I used Williams pilots which means they have zero detail so I may upgrade them whenever I stumble across something nicer.

BO GP30 New GP9_20190512_111631371

Great looking pair there, Ralph.  Is it purely coincidence or were you purposely trying to replicate the GP9/GP30 combo in the B&O museum?  If the latter, you nailed it!

Bruce

Worked on my track problem but still hitting a wall. Tried running ground at the end of the track looping it between the outside rails. Strange thing was I could start a legacy engine from the back and from the front but when they hit the section under the stairs they die. I am wondering if after all this time the tracks under the stairs have a lot of dust on them. Since I can't find my track cleaner I am going to use the wife's swifter with either a micro fiber rag or a terri cloth rag on top of the rails. The handle of the swifter should be long enough to reach the furthest tracks under the stairs. Tomorrow I'll try again..... If that fails I'll have to add the other plug to run ground and power to those rails...........Paul 2

Thank you everyone for the comments on the Ceiling Central RR.  Yes Bob, I am afraid I will be drop an engine.  The #23 would be a sad one to loose.  I have improved getting up there with a two step three-foot folding platform I found in my dad’s shop when we were cleaning it out last summer.  It’s real handy for using.  I have some balance troubles that must be caused by my sciatic pain med.  My ceiling is 7’ 4” High.  

Mike, I think it would be a good addition once the regular layout is well along.  At least your ceiling is a standard eight feet.

Ralph, another excellent looking B&O unit.

Paul, I’ll bet you do have trouble with dirt under the steps.  

I just received my new Lionel Baltimore and Ohio GP9 #3419 back from Lionel Service.  The gears on the front truck did not mesh properly when I bought it, so Lionel installed a new Truck.

Unfortunately in the process, Lionel broke off the front lift bar and replaced it with an all black wire bar that is a smaller thickness and not painted to match the engine.  The body shell also dips downward on the back non-engineer side.  I believe the frame got bent downward, pulling the shell down when screwed to the frame.  A wire vertical stanchion was glued back to the rear of the Cab walkway too.

I am not happy about this engine repair.  I am still waiting for a refund check from Lionel for my CSX F40PH #9999 that was sent to Lionel two months ago.  I was told that Lionel will probably issue refund checks in June, hopefully of this year.  Model Railroading should be fun. The Lionel repair issues are not.  My C&O Allegheny Steam Whistle #1604 still does not run correctly after service by Lionel. The service technician who worked on it no longer works for Lionel according to the service call center.  Lionel did refund my money on the Vision Line GG1 #4913 that they could not fix after three attempts.

Boy, I hope I start having fun with model railroading soon.

Sincerely, John Rowlen

Attachments

Images (5)
  • DSCN7052
  • IMG_0406: Correct lift bar size and white paint.
  • IMG_0408: Replacement black thin Lift Bar and glue residue on mounts.
  • IMG_0409: Lift bar will not stay down and pops up.
  • IMG_0401: Paint strip bows downward to the back of the engine.
Last edited by John Rowlen
Mark Boyce posted:

Mike, I haven't forgotten the Ceiling Central RR photographs.  I hope to get them up this weekend!  

Hi Mark,

My mom died in January and my brother and I are taking care of our dad. We have been working with him to get him driving and somewhat self sufficient. It is a lot of work. Fortunately we sold their house 4-5 years ago and he lives in one of my brothers duplexes. After 8-10 hours of work and a hour with my dad, I am done. 😜

Hang in there Mark, honoring our parents is one of God’s top commandments. We will get time for our trains.

Been testing all turnouts with a couple of PRR T-1 4-4-4-4  engines, which in mechanical reality is a rigid frame 4-10-4 with the middle drivers missing. 

Bottom line, DO NOT USE ATLAS #5 WYES on a long wheel base locomotive.  The T-1 will take a regular Atlas #5 but wants to ride up the rail head of a Atlas  #5 "Y".

I have posted yard restrictions on these loco's.

  • Hi everyone, i hope your all having a great day! I handed out alot of likes cause I am at the doctor's with the wife. You all sure have been busy! Just a few comments  sorry if I don't comment on you, it a little hard on the phone.
  • Elliot,  thanks for all the information!  It's great how everone here is willing to share!
  • Paul 2, i sure hope you get your electrical problem figured out! Might have to take some stair treads off to get to the track! Lol
  • Kevin, great progress! I wish I was that far, but it's the journey that's the fun part!
  • We'll yesterday I got all my toggle switches done and all the TSM's I have installed work great! I thought while I was under the layout I might as well put power to my sidings threw more toggle switchs so I can cut the power whenever I want. The wife is taking me to hobby lobby to buy me some static grass for her park under the airfield. LOL it's ok for her to buy train stuff, but kills her when I do!
  • We'll everyone have a great day!

Mike, removing some of the stairs in way down on the list. LOL. Before I did any work I tried running a conventional engine through but that stopped in the same spot as the DCS and Legacy. I made a hole for the plug and then took adhesive and glued it into the facia. While that was drying I added a terminal block to run wires from the tracks to there. Once the glue dried I took the other end of the plug and plugged it in. Took wire and cut it to length connecting it to the plug wires and the terminal blocks under the liftout. Seeing tomorrow is a TCA lunch get together then a Tuesday night crew get together I doubt I'll have anytimne for the layout. But I should have all day Wednesday to work on the wiring problem. Couple of pics...........Paul 2

DSCN0589DSCN0591DSCN0592

Attachments

Images (3)
  • DSCN0589
  • DSCN0591
  • DSCN0592
Guitarmike posted:
Mark Boyce posted:

Mike, I haven't forgotten the Ceiling Central RR photographs.  I hope to get them up this weekend!  

Hi Mark,

My mom died in January and my brother and I are taking care of our dad. We have been working with him to get him driving and somewhat self sufficient. It is a lot of work. Fortunately we sold their house 4-5 years ago and he lives in one of my brothers duplexes. After 8-10 hours of work and a hour with my dad, I am done. 😜

Hang in there Mark, honoring our parents is one of God’s top commandments. We will get time for our trains.

Mike,

Thank you for the encouragement.  Dad has was wanted the house and 4 acres to stay in the family since it has be since 1888.  After 2+ years and no one in the family able to take it on, looks like we will have to sell.  I actually spend more time at the house than visiting my parents at the personal care home and my aunt at another home.  My mother-in-law lives across the road from us.  She is the healthiest of the four, but commands the bulk of the time.  I got back to work in a new part time job after an early retirement and 6 months out of work.  Yes, my wife and I ware whipped every evening!  I did file for social security myself last week, a few years earlier than I had thought I would.

You are so right that honoring our parents is one of God's top commandments; and that is true even more so when our parents are less capable physically and mentally.

Working on seated & standing figures for two Baltimore and Ohio passenger cars. MTH - RailKing

1 Remove screws

1. Remove screws on the bottom of the car.

2 Remove the roof

2, Remove the roof, place your left hand on the left side of the car & your right hand on the right side of the car. Then gently twist your hands in opposite directions and the roof will pop off.

3 Seated figures in car

3. Place all the seated figures & standing figures. You may have to cut off their legs just about the angles using a wire cutter and then finish with a cordless Dremel tool. I used Gorilla 100% Silicone Sealant Clear as the adhesive and Amazon figures.

4 Side view

4. Replace the roof, side view.

5 Man at the door

5. Man looking out the door.

6 Mail Car

6. The second car is the mail and cargo car. With standing & seated figures.

7 Mail Room

7. Closeup of the mailroom.

8 Mailroom outside

8. Man looking out the mailroom door.

9 Side view

9. Side view of the mail car.

Gary

Attachments

Images (9)
  • 1 Remove screws
  • 2 Remove the roof
  • 3 Seated figures in car
  • 4 Side view
  • 5 Man at the door
  • 6 Mail Car
  • 7 Mail Room
  • 8 Mailroom outside
  • 9 Side view

Elliot, you are right, we do have our own little world here! But man what a great world to live in!

Paul 2, I sure hope this new wire fixes things! I cant wait to see what the final fix is!

Mark, I am glad you can still take care of your parents! But sorry that you might sell there house! Get your girls to make it into a Bed and Breakfast joint! Either way take care you yourself, family , friends! Don't worry God will take care of you!

Gary the people in your cars are looking great!

I didn't get anything done in the train room today as spent way to much time with tubbing and doctor appts for the wife and I. By the time we got home we were both whipped!

Tomorrow has to be better! So there is my bright side for now! LOL

Put the last dining table in the cook house, and that finishes the kit logging bunk house and scratch built cook house.  Made good progress on this severely bashed Plasticville coaling tower.  Scratched a loading spout and a sanding tower to attach to it.  Found a great picture of a small one on the net and am approximating it.  Need to add hoisting cables and pulleys, and other small details.  Now l don't need to build a 200 ton one.  When finish tower, will photo and post all three.

CoastsideKevin posted:

Took a moment to gaze out over the attic layout and reflect on how far it has come. Here is a picture from mid-October compared to one from last night. For those of you with limited space for trains, there is hope!

542637E7-D9F5-4147-AD59-F8C9F16E0512

Kevin;

I envy you your space, but not your headroom   Having just had my second knee replacement in two years, my knees scream in pain just THINKING about crawling around your layout!!! (which looks like a lot of fun)

Nothing yet but give me a few hours.  Last night however the mad dash to complete this project finally got started and ground to a slow roll immediately.  Due to the size of the bar track it needs, you guessed it, booster drops.  Oh how we long for the days of the little round track with 9 or 10 pieces in the oval and plenty of power to run the locomotive ALL THE WAY around the track, using 24 gauge wire.  At least that's what mine looked like in 1971.  8 curves, 2 straights, 5 cars, 1 locomotive, and two teeny green wires running to a clip from a small black box with a silver lever.  One push upward and off we went.

Not today Myron.  46 track pieces, 18 gauge wire, working too close to the ceiling, pain stakingly cutting small grooves in the Styrofoam with a hot knife attached to a 25 foot extension cord, hooking wires together, digging out ruts to push the mess down into so the track will sit flat on the surface, Gorilla Tape works, and hoping that when I'm done none of my connections will have disconnected.  By the time I'm done, overkill won't even begin to describe this wiring super highway.  I ran a Lion Chief Mikado steam engine as a test case around a portion of the track a few nights ago and it did great until it reached the far turn.  Half way around the curve it stopped and didn't respond to its remote.

Hopefully after I finish wiring the booster drops, that engine and all others will have NOOOOOO problem completing a full circle.  Hopefully by middle of next week I'll finally have those pictures I promised. 


Nice work everyone. 

Train room Gary,  The B&O passenger cars look very good. I like passenger cars that are well detailed.  The details make a big difference on our railroads.  Without them, it is just a toy train running in a circle.

Good news,  The Lionel dealer has agreed to refund my money for the new B&O GP9 #3419 that Lionel Service damaged when replacing a bad truck. The engine body shell was perfect when it went to Lionel Service, and came back missing the original front Lift Bar. A thinner unpainted replacement lift bar was poorly glued to the front of the engine. I don't understand why my engines get nicked up when going to Lionel for warranty work.  I am still waiting for the Refund Check from Lionel for my new CSX F40PH #9999 that was destroyed over three trips back to Lionel for service. All the body mount posts were broken.

Sincerely, John Rowlen

Attachments

Images (3)
  • IMG_0408: Lionel DAMAGED the frony lift bar and replaced it with a thinner blak lift bar.
  • IMG_0409: A beautiful engine is now a piece of crap.
  • DSCN7052: Origibal Gear issue on new engine

Good morning everyone!

Mark, I am sure you could find something to do with the old house, maybe rent it? 

Johan, great looking car and what a wonderful scene!

John R. I am so sorry your going threw some much trouble with your engines! But I am sure glad that your Lionel dealer has stepped up to take care of you! I hope MOM is doing well!

So yesterday after work I came home and did a little work in the train room. I was trying to figure out my building placements on the siding and I really wanted to have the Morton salt building along the very back. SO I did a little kit bashing and was able to move the silo from the back to the top which gave me a little room after cutting a small square section out for the duct work. Please forgive me Mark the Menards guy! I really like the building and knew where I really really wanted it!  It was a real PIA to get the grass off of the bottom of the silo legs but I got it and went out this morning at 4AM and repainted it so it will be dry when I get home from work!

Here are a couple pictures. give me your thoughts!

Yee Ha~! It's hump day!  Everyone have a great day, its almost the weekend! LOL20190514_19574320190514_19584120190514_19585420190514_200727

Attachments

Images (4)
  • 20190514_195743
  • 20190514_195841
  • 20190514_195854
  • 20190514_200727
mike g. posted:

Good morning everyone!

Mark, I am sure you could find something to do with the old house, maybe rent it? 

Johan, great looking car and what a wonderful scene!

John R. I am so sorry your going threw some much trouble with your engines! But I am sure glad that your Lionel dealer has stepped up to take care of you! I hope MOM is doing well!

So yesterday after work I came home and did a little work in the train room. I was trying to figure out my building placements on the siding and I really wanted to have the Morton salt building along the very back. SO I did a little kit bashing and was able to move the silo from the back to the top which gave me a little room after cutting a small square section out for the duct work. Please forgive me Mark the Menards guy! I really like the building and knew where I really really wanted it!  It was a real PIA to get the grass off of the bottom of the silo legs but I got it and went out this morning at 4AM and repainted it so it will be dry when I get home from work!

Here are a couple pictures. give me your thoughts!

Yee Ha~! It's hump day!  Everyone have a great day, its almost the weekend! LOL20190514_19574320190514_19584120190514_19585420190514_200727

Good evening Mike & guys. Thank you Sir. Your layout looking better and better. I can pack my weathering set and visit your layout when you sleep. After you wake up, you said what a .... who has weathered my Morton Salt building? 

😂🤝😞

Johan

After mulling over the pros and cons I began installing an atlas double slip switch in place of 2 GG  right hand turnouts.  The complexity of the double slip should add a fascinating point of interest.  A third right hand turnout directly connected to it is also being upgraded with an atlas #5.  As of this morning everything is levelled and fastened down. Next comes the installation and wiring of under the table switch machines along with the special electrical connections needed to reverse polarity on closer rails.  Only then can testing begin to determine if each engine in the roster can negotiate the turnout without incident.  Fingers crossed!

Bruce

Mike,  The kit bashing of the Morton Salt building looks great.  I call this "puzzle work" as you try to get all the pieces in the correct place: tracks, buildings, and retaining walls on hillsides for adequate clearances.

Mom is eager for me to downsize my Lionel collection. She sees the new engines are nothing but headaches. I have had to return the last six new engines to dealers.  Kristen at Lionel Service assured me that Lionel is not Targeting my repairs. They are having items coming back for a second time from other buyers.

I hope to run the layout today as I gather some trains to list on Ebay.  I'll post some pictures.

Have a good day.

Sincerely, John Rowlen

I've only puttered around the last few days. I made some improvements on the Archie Harrison Supercomputer (an empty computer case that I have turned into a giant supercomputer that towers over my lay-out).

I assembled two simple Lego structures that came with my two dead rail trains.

I finished assembling all but one of the model buildings someone gave me.

Last edited by Vincent Massi

Mike g, I like what you did with the morton salt building and looks like you have been getting more done on the layout.

Elliot, nice to hear your son is moving back. More quality time together. So it sounds like the open house went better then anticipated. As you get more and more done especially with the scenery the layout will blow people's minds and they'll walk away with a good feeling and spread the word even more about your layout.

Johan, I think that would be a great idea if you would start making house calls to do our wethering for us.

JGTRH62, I think those Lionel scale boxcars are the best thing going. Nice job adding the Kadee's

Morning was outside work again but after lunch I had a chance to go down and start working on the wiring problem. I flipped a coin to see if I would start with power or ground. Power won out so after I tied in the wires I turned on the transformer so see if I solved my problem. Luck was not with me so after dinner I'll do the ground. I still have to clean the track just in case that was my problem all along. Pics............Paul 2

DSCN0594DSCN0595DSCN0596

Attachments

Images (3)
  • DSCN0594
  • DSCN0595
  • DSCN0596
paul 2 posted:

Mike g, I like what you did with the morton salt building and looks like you have been getting more done on the layout.

Elliot, nice to hear your son is moving back. More quality time together. So it sounds like the open house went better then anticipated. As you get more and more done especially with the scenery the layout will blow people's minds and they'll walk away with a good feeling and spread the word even more about your layout.

Johan, I think that would be a great idea if you would start making house calls to do our wethering for us.

JGTRH62, I think those Lionel scale boxcars are the best thing going. Nice job adding the Kadee's

Morning was outside work again but after lunch I had a chance to go down and start working on the wiring problem. I flipped a coin to see if I would start with power or ground. Power won out so after I tied in the wires I turned on the transformer so see if I solved my problem. Luck was not with me so after dinner I'll do the ground. I still have to clean the track just in case that was my problem all along. Pics............Paul 2

DSCN0594DSCN0595DSCN0596

Paul. Thank you very much. The weathering service is a my dream job and stay, because i live here in Finland. 🌏

Johan

Lee, your scenes with vehicles are always so interesting. I just bit on two 1951 semis I found on diecast direct for a decent price. Can't wait to see if I did the right thing. They are 1/43.

Elliot, Shirley and I will be doing the Menards show once again. So we will again be a hop, skip and a jump from you guys. Any of you forum members should think about seeing Elliot's layout it is well worth any drive to see. Heck  we drove 750 miles to see it. Not all in one though. So send Elliot that email to see it.

Johan, thanks for thje information on that state of maine boxcar. I actually found one the next day and got it in the mail today. Great looking car.

After geting the car I took the wife out for dinner and then decided wait till tomorrow to tackle the wiring again. Here's a pic of the boxcar. I was surprised to find one considering it was released in the 2011 MTH volume 2 .......Paul 2

DSCN0597

Attachments

Images (1)
  • DSCN0597

Evening everyone, I hope you all had a great day!

Brian, Great Chessie Pictures! You sure know how to catch them all in the best pose! LOL I am glad you like the change to the Morton Building!

John, that Santa Fe Auto Parts car sure is one sharp looking car! I just might have to get one down the road some day!

Johan, Thank you sir! Your Always welcome here and who knows maybe one day I will get back to Europe! 

John R, Thank you sir! I agree it is a puzzle game! Sometimes it takes a few try's to get things to fit! I am sorry that your down sizing, but I guess we all will one day!

Paul 2, Thank you also! Not really getting a lot done just little things here and there! I sure hope the ground wire or the cleaning fix your power problem! 

LEE D. You sure have a cool looking layout with some great vehicles! I could look at it all day, very cool!

Elliot, here is a picture for you cause your not getting any. Its the finished Kit bash of the Morton building, I repainted the silo and stand, the piping coming from it. So now all I have to di is wire it up and get track to go threw it! LOL

Everyone have a great Thursday AKA PREFRIDAY! 20190515_160122

Attachments

Images (1)
  • 20190515_160122

Paul. I hope you win they might just work I know Patrick some how makes those 1/43 scale semis look small and blend right in. Thanks for the complement glad you enjoy looking at it 

Jack. What a steel! Glad you got it for a cheap price those are getting hard to find. I think Paul has the market cornered on them 

Mike. Thanks for the complement that mean a lot coming from you and Paul thanks 

paul 2 posted:

Lee, your scenes with vehicles are always so interesting. I just bit on two 1951 semis I found on diecast direct for a decent price. Can't wait to see if I did the right thing. They are 1/43.

Elliot, Shirley and I will be doing the Menards show once again. So we will again be a hop, skip and a jump from you guys. Any of you forum members should think about seeing Elliot's layout it is well worth any drive to see. Heck  we drove 750 miles to see it. Not all in one though. So send Elliot that email to see it.

Johan, thanks for thje information on that state of maine boxcar. I actually found one the next day and got it in the mail today. Great looking car.

After geting the car I took the wife out for dinner and then decided wait till tomorrow to tackle the wiring again. Here's a pic of the boxcar. I was surprised to find one considering it was released in the 2011 MTH volume 2 .......Paul 2

DSCN0597

Paul. Thank you. I am glad you found that car.

Johan

Big_Boy_4005 posted:

Sure Mike, it's pretty simple really. I bought a gallon of a color called potting soil, but you could just take a picture of a rail into the paint store and get it matched, or you could just pick a nice dark brown from the chip rack.

Some guys buy rattle cans to paint their rail, but I wouldn't want to use those in the train room, and just went with Latex. That's OK if you paint before you lay, but once it's down, I think the latex route is better. Beside, you can get any shade, and aren't limited to what comes in a can. There is one drawback to latex, and that is, it doesn't like to stick to the bare metal very well, and scratches off easily if you aren't careful.

To apply it, I just use the cheapest external mix air brush. You can pick one up on eBay for around $10 or a little less. Then you thin the paint to about the consistency of cream, and blast away. 

Remember, everything that doesn't go on the rail, goes in the air, and lands on everything! I took an old desk fan, and an old box and a new furnace filter. Then I cut out the bottom of the box and had the fan blow into it, placing the filter on the other end to catch the over spray. It really helps keep the dust down.

It may take a couple coats to cover properly. Just let it dry between coats. I like to scrape the paint off the blackened center rail, making it black again. It's a little more work, but I like the look. I use a piece of Masonite to scrape the tops of the rail clean.

You shouldn't need anything close to a gallon for your layout. By the time you get it thinned, a quart should be plenty, but you'll need a larger container to hold it with all the extra water.

Hey Elliot,

 I have used latex paint that I had color matched to get a concrete color on my old trolley line, I also mix a shade of brown with plaster when doing scenery work. I hate to see white showing through. 

Instead of a cheap air brush I wonder if you could use a spray bottle? It would keep the dust down.

BAR GP7 #63 posted:
paul 2 posted:

Lee, your scenes with vehicles are always so interesting. I just bit on two 1951 semis I found on diecast direct for a decent price. Can't wait to see if I did the right thing. They are 1/43.

Elliot, Shirley and I will be doing the Menards show once again. So we will again be a hop, skip and a jump from you guys. Any of you forum members should think about seeing Elliot's layout it is well worth any drive to see. Heck  we drove 750 miles to see it. Not all in one though. So send Elliot that email to see it.

Johan, thanks for thje information on that state of maine boxcar. I actually found one the next day and got it in the mail today. Great looking car.

After geting the car I took the wife out for dinner and then decided wait till tomorrow to tackle the wiring again. Here's a pic of the boxcar. I was surprised to find one considering it was released in the 2011 MTH volume 2 .......Paul 2

DSCN0597

Paul. Thank you. I am glad you found that car.

Johan

Very nice Paul. Must have been karma that you found one so quickly.

Bob

mike g. posted:

Evening everyone, I hope you all had a great day!

Brian, Great Chessie Pictures! You sure know how to catch them all in the best pose! LOL I am glad you like the change to the Morton Building!

John, that Santa Fe Auto Parts car sure is one sharp looking car! I just might have to get one down the road some day!

Johan, Thank you sir! Your Always welcome here and who knows maybe one day I will get back to Europe! 

John R, Thank you sir! I agree it is a puzzle game! Sometimes it takes a few try's to get things to fit! I am sorry that your down sizing, but I guess we all will one day!

Paul 2, Thank you also! Not really getting a lot done just little things here and there! I sure hope the ground wire or the cleaning fix your power problem! 

LEE D. You sure have a cool looking layout with some great vehicles! I could look at it all day, very cool!

Elliot, here is a picture for you cause your not getting any. Its the finished Kit bash of the Morton building, I repainted the silo and stand, the piping coming from it. So now all I have to di is wire it up and get track to go threw it! LOL

Everyone have a great Thursday AKA PREFRIDAY! 20190515_160122

Mike. Thank you very much. That woukd be a super nice.  Welcome anytime. 🤝

mike g. posted:

Good morning everyone!

Mark, I am sure you could find something to do with the old house, maybe rent it? 

Johan, great looking car and what a wonderful scene!

John R. I am so sorry your going threw some much trouble with your engines! But I am sure glad that your Lionel dealer has stepped up to take care of you! I hope MOM is doing well!

So yesterday after work I came home and did a little work in the train room. I was trying to figure out my building placements on the siding and I really wanted to have the Morton salt building along the very back. SO I did a little kit bashing and was able to move the silo from the back to the top which gave me a little room after cutting a small square section out for the duct work. Please forgive me Mark the Menards guy! I really like the building and knew where I really really wanted it!  It was a real PIA to get the grass off of the bottom of the silo legs but I got it and went out this morning at 4AM and repainted it so it will be dry when I get home from work!

Here are a couple pictures. give me your thoughts!

Yee Ha~! It's hump day!  Everyone have a great day, its almost the weekend! LOL20190514_19574320190514_19584120190514_19585420190514_200727

Mike, Renting it out is one option!  Unfortunately I don't want to become a slum lord in a rural area being inundated with new construction.  Besides the place needs so much to keep the modern family happy.  The interior is virtually unchanged from my dad's first recollections in the '30s except he said they got their first furnace in 1936.  Our daughter suggested it should be a historic landmark, but nothing happened there and on one of any notoriety ever lived there!  

On to the Morton building!  You did a great job on it!  Better make sure the Salt Girl doesn't spill any salt on the tracks!  

Ralph M posted:

Well it didn't me long to upgrade. My "blue dip" GP9 dummy now has cab figures, LED headlight (long hood forward of course)  with on/off switch, correct fuel tank and detailed Premier step pilots with cut bar. 

BO GP9 6463 20190516_170104

Ralph, units just like that used to run through Valencia Pennsylvania when I was a kid!  The engineer would always wave while I was waiting on my bicycle!!

Mark Boyce posted:
Ralph M posted:

Well it didn't me long to upgrade. My "blue dip" GP9 dummy now has cab figures, LED headlight (long hood forward of course)  with on/off switch, correct fuel tank and detailed Premier step pilots with cut bar. 

BO GP9 6463 20190516_170104

Ralph, units just like that used to run through Valencia Pennsylvania when I was a kid!  The engineer would always wave while I was waiting on my bicycle!!

Thanks Mark. This is the look I was going for - what they look like after years and years. I've still got some weathering to do. 

(John C Durant photo)

bo6464

Attachments

Images (1)
  • bo6464
Ralph M posted:
Mark Boyce posted:
Ralph M posted:

Well it didn't me long to upgrade. My "blue dip" GP9 dummy now has cab figures, LED headlight (long hood forward of course)  with on/off switch, correct fuel tank and detailed Premier step pilots with cut bar. 

BO GP9 6463 20190516_170104

Ralph, units just like that used to run through Valencia Pennsylvania when I was a kid!  The engineer would always wave while I was waiting on my bicycle!!

Thanks Mark. This is the look I was going for - what they look like after years and years. I've still got some weathering to do. 

(John C Durant photo)

bo6464

And look at that, you are only one digit off on the road number.  Must be the right series of numbers!

Evening everyone, I hope you all had a great day!

Brian, great pictures! Anything new on your new layout? I am sure Marci is keeping you busy, plus you have to take the time to get Izzy her ice cream! LOL

Greg, its a start! Slow and easy as you move forward! LOL

Vincent, looks good. Do you still get OGR on that? LOL

Johan, your more then welcome! I love everything you post! The wife says one day when I bring up a trip to Europe. I want to take her to show here where I was an Embassy Guard and everything else! LOL

Ralph Nice work! Now that you got your engines mostly done, what's next?

Mark, thank you sir. I think your daughter is on the right path, how many buildings that old still around that you could truly live in? Plus there was some notoriety there! Your Dad and Mom lived there, then of course you came along! What more do you need! LOL

Today after work I went out and set up a ventilation system and painted some track, I really like how it looks and I used earth Brown from Rust-o-leum thanks to Dave AKA Darlander! I think it looks great, now I have to move a lot of stuff to paint the other end!

BEFORE                                             20190516_182108                                             AFTER                                                                                                                                                                                                                                       20190516_182059

Attachments

Images (2)
  • 20190516_182108
  • 20190516_182059

Mike g, track looks good. 

BRIAN, you always seem to find good pics to post along with your engines and cars.

Today I had to work in the yard, cut grass and plant grass. Because it looks like rain through the weekend. But after dinner I managed to put some time in on the layout. Am I making headway not really. Still working the problem. I added all the ground wires and fired up the track only to find I still have the problem of the engine stopping in the same spot. I rechecked all the track with a voltage meter and with the transformer set at 17 volts that is what I was getting all the way through the track to the very end. The only thing left to do it clean the track real good to see if that is the problem. I sure hope that will be the solution. Pic..............Paul 2

DSCN0598

Attachments

Images (1)
  • DSCN0598

Paul 2, I sure hope cleaning works! I have no idea what would be the next step! Sorry!

Well my Mom and Brother are coming over from Seattle area today after I get done Tubing and I hope to have a nice visit with them. They haven't see the train room since the bench work has been up so I hope they are surprised! After they leave I will move things around so I can hope to get the rest of the track I have down painted, if not I have the weekend!

Well folks, its FRIDAY! I hope everyone has a great weekend

Mark Boyce posted:

Paul, I sure hope cleaning takes care of it.  Surely there isn’t an uneven spot in the track where the engine doesn’t make contact. I hope you get it solved today.

Mike have a great visit with your mother and brother!!

Thanks Mark, I haven't seen them in almost a year, do to everyone's doctors appointments! LOL Should be a nice day!

Paul - I already had you and Shirley penciled in. I'll go over it with ink.

Mike - The layout is really coming to life, and the Morton Salt building turned out great.

GuitarMike - I'm not sure if a spray bottle would work, but I kind of doubt it. A few problems with that idea. First, if you could get the mix thin enough to go through it, it probably wouldn't cover very well. Then there's the matter that the mist isn't very fine, and the large droplets would want to bead up on the rail. Finally, your finger would get very tired. You will still have over spray, but it won't travel as far, because of the lower pressure. You are welcome to try, I think I'll stick with my method. There is one more thing I could do to improve my fan method, and that would be to add a three sided box, to form something of a booth effect, better directing the air through the fan and filter, reducing the amount of dust escaping. Moving it is just an extra hassle when painting. Flip a coin between that and the dust. Slow you down while doing it or after to clean it up. Can't win.

Mark - Don't wait too many years.

Well guys, I did it again, I tripped and fell. This time I did my right knee almost exactly six months after I did the left one. I was upstairs putting away some groceries, and I just didn't pick up my right foot enough. It was like my toe just hit something sticky on the floor, and I lost my balance, then BOOM. There wasn't anything on the floor.

The funny thing was, I was just planning on going downstairs to work on the layout for the first time since the layout tour. The good news is, I didn't land on the concrete this time. The bad news is, it hurts just as bad as the last time, maybe even a little worse. I can't even get off the couch without help from my wife. That said, just think of all the other things I can't get up from without help. It definitely slows down trips to the refrigerator, not my idea of a diet plan though. Haven't been to the doctor yet, maybe Monday. I can't even drive like this.  

mike g. posted:

Evening everyone, I hope you all had a great day!

Brian, great pictures! Anything new on your new layout? I am sure Marci is keeping you busy, plus you have to take the time to get Izzy her ice cream! LOL

Greg, its a start! Slow and easy as you move forward! LOL

Vincent, looks good. Do you still get OGR on that? LOL

Johan, your more then welcome! I love everything you post! The wife says one day when I bring up a trip to Europe. I want to take her to show here where I was an Embassy Guard and everything else! LOL

Ralph Nice work! Now that you got your engines mostly done, what's next?

Mark, thank you sir. I think your daughter is on the right path, how many buildings that old still around that you could truly live in? Plus there was some notoriety there! Your Dad and Mom lived there, then of course you came along! What more do you need! LOL

Today after work I went out and set up a ventilation system and painted some track, I really like how it looks and I used earth Brown from Rust-o-leum thanks to Dave AKA Darlander! I think it looks great, now I have to move a lot of stuff to paint the other end!

BEFORE                                             20190516_182108                                             AFTER                                                                                                                                                                                                                                       20190516_182059

Mike. Thank you. Sound a you must a plan some trip. Where in Europe you have been a working? 

Johan

Elliot, Mark - Don't wait too many years.   How right you are!!  None of us know how many years we have left where we can get around.  I am so sorry about your fall!  I hope you recover quickly.  I am well aware of the possibility of falling.  Since I had the damaged sciatic nerve in November, I have a drop toe where I have to really pay attention to my walking.  I have caught the toe of my shoe even on carpet.  So far I have only twisted the other knee that I have been getting the shots in to hold out a couple more years before a knee replacement.  However, I could easily go down and really tear something up.  We are getting our finances in order as forced retirement is coming to my wife as to me.  Once we start getting my Social Security checks, my wife's pension, and move around some investments, we should have a better idea of how to spend.  Right now we got caught a bit off guard and there isn't much coming in each month. 

Johan, The Altoona a car looks great!  The Horseshoe curve is only about 50 miles form where I live.

John, That is a great photograph of trains on your new track!

Last edited by Mark Boyce

Jeepers Elliot, please be careful. Look before you walk. I hope the pain subsides quickly.

Mark, sometimes we just have to align ourselves to the fact as we get older we have to more and more watch out around us and take it slower.

John, very nice work on the module.

Johan, that's another good looking car. 

Another day went by with errands before I could get down to the layout. But I may have turned the corner. I borrowed the wife's swifter and  took a microfiber cutting it to fit the swifter. I had bought a can of denatured alcohol.  Attaching the microfiber to the swifter I wetted the rag placing it on the track and rubbing it back and forth as far as i could reach. Then I went around to the other side and did the same thing. I let it dry for a bit then I got an engine and started running it through. After a couple of tries I now can run the train all the way through. I still have a slight problem with signal. But tomorrow after I hit a train show in Middleburg heights I'll change out the batteries for fresh ones in the legacy and the DCS. To further clean the track I have to find my track cleaning car or borrow one from one of the guys in the club. So I really feel good with the way it went tonight. Some pics......Paul 2

DSCN0599DSCN0600DSCN0601DSCN0602DSCN0603DSCN0604DSCN0605DSCN0606DSCN0607DSCN0608DSCN0609DSCN0610DSCN0611DSCN0612

Attachments

Images (14)
  • DSCN0599
  • DSCN0600
  • DSCN0601
  • DSCN0602
  • DSCN0603
  • DSCN0604
  • DSCN0605
  • DSCN0606
  • DSCN0607
  • DSCN0608
  • DSCN0609
  • DSCN0610
  • DSCN0611
  • DSCN0612

It was a big day on my mountain.  By 9:00am I had 14 feet of fence down.  Then the waiting....  At 3:08 a new-to-me building was on it's way to me.  

This is the new location (forth since October) for the Bald Rock Mountain Railroad.  I will have to run power to the building.  Any idea how much total current I should design around including lights and a small heater.  The building interior is 8x8.  Do y'all think 30 amps are enough.

I will finish putting the fence up tomorrow.DSC03111

Attachments

Images (1)
  • DSC03111: BRM Railroad world headquarters
Odenville Bill posted:

It was a big day on my mountain.  By 9:00am I had 14 feet of fence down.  Then the waiting....  At 3:08 a new-to-me building was on it's way to me.  

This is the new location (forth since October) for the Bald Rock Mountain Railroad.  I will have to run power to the building.  Any idea how much total current I should design around including lights and a small heater.  The building interior is 8x8.  Do y'all think 30 amps are enough.

I will finish putting the fence up tomorrow.

The small heater is the wild card. Could be 7A, could be 15. I'd pick the heater then calculate power.

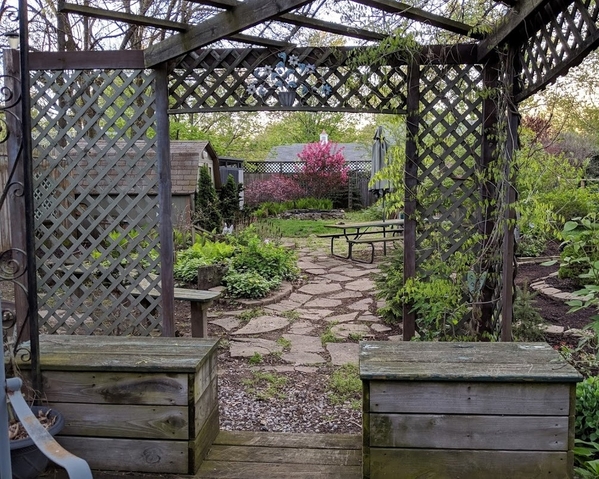
Woops, I hit enter too soon.  Now that I have all my pictures attached.  The track frame is 1/4 inch angle iron set atop 1/4 inch flat steel formed in the shape of an L lag bolted to the columns.  The track sits atop 1/2 inch Styrofoam pads cut from 4x8 sheets.  The curves are 1/4 inch steel arcs painstakingly measured and designed by my friend Hunter.  Once cut out they were set with clamps, and the mounting pieces, which I showed you in the photos, were measured out and cut, drilled, tapped, and low and behold they worked.  Curve 3 got messed up big time so Hunter elongated the holes and solved the problem.  Once the curves were on, the Styrofoam went quick, but the booster drops were a pain.

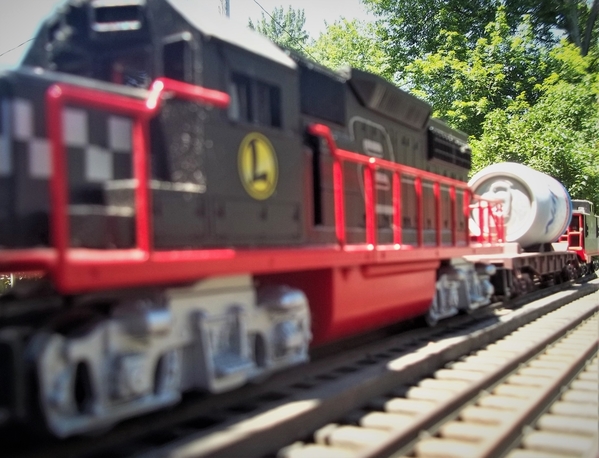
I used Fastrack because I had Fastrack on hand.  I promised a picture of the Burger King locomotive, well, there it is.  It has a Hershey tanker, a Wheaties box car, a Lobsterville vat car, or as I call it, a mistake buy.  Thought it said Red Lobster.  A Crayola caboose and my favorite, the Morton Salt hopper.

I added pics of how the wiring was run.  Starts at the transformer, feeds the TIU through the Variable 1 in ports, then feeds the track through the variable 1 out ports, by snaking its way down through the floor of the shelf, behind a fake wall at the back of the cabinet, down under the bottom of the last shelf out through the face of the bottom of the cabinet under the porch carpet I used for a floor cover making a noticeable bump, then through the wall of the column, picture shows the outlet cover I used to cover the box.  Once there it snakes upward toward another outlet cover and using sticky back Velcro I moved it along the wall, up to the hanger face, and over to the access point I showed you in yet another picture.  Once through the Styrofoam, it connects to the 10 inch track piece above it, and then using red and black 18 gauge wire I ran booster drops off this piece to pieces at the beginning and opposite side of each curve. 

Once completed, I set the loco on the track, and after some tweeks and a learning curve, it ratcheted around the track forward and backwards with no issues.  I kept adding cars one at a time to test its pulling power and settled on the ones mentioned above and shown in the picture.

I added pictures of my DT&I Yardmaster set that I got from Santa in 1971.  I also added a picture of my old toy chest, now a storage chest, that my maternal grandfather built for me in 1965.  53 years it finally has a home it can be proud of.  A note, if you look at the picture closely, a fishing rod sits to the right of it.  This is the rod my paternal grandfather used once before he died.  I used it to catch an 8 pound Bass in 1995.  Finally I added a picture of 3 of my 5 trains.  Just thought you might like to see them.  All of you have been so nice to add pictures of your train set ups.  I've enjoyed looking at all of them.  I hope you enjoyed seeing a small part of mine.

Now I have a question.  My SD 70 ACE has suddenly begun to throw sparks from the pickup wheels.  None of my other four locomotives do this.  I assumed dirty track, dirty wheels, but the other four run the same track, no sparks.  They've been dormant for several weeks now since I have been finishing Liam's track.  I have a propane heater in the room.  Any ideas as to why one would suddenly start sparking and the others don't?

Thanks

John

Attachments

Images (5)
  • along a hanger up through the styrofoam to a track piece: then connects to several other track pieces
  • liam's train: Liam is my 4 year old grandson
  • 1971 DT&I Yardmaster set: just thought you'd like to see it
  • toy box my grandfather built me in 1965: with no idea i'd get into trains
  • 3 of my 5 trains: all 11 to 12 cars long

Cut, fit, assembled, disassembled and glued some 50+ popsicle sticks. 

IMG_20190516_201716~2

Cleaning up scap wood I paused to make large ..?...Scrapwood bin? Coal? Firewood? Produce /Eggs for sale?  

  The stick was whittled to smaller than toothpick diameter and a small piece of Scotchbrite was used for broom bristles...one with the good oak handle...red oak

IMG_20190517_054355~2


IMG_20190517_054245~2


IMG_20190517_173058~2

Attachments

Images (4)
  • IMG_20190516_201716~2
  • IMG_20190517_054355~2
  • IMG_20190517_054245~2
  • IMG_20190517_173058~2

I painted the bin as a colorful Farm stand.

The hinge is vinyl pin stripe. I added 3 prop-stick pole holes .... and built my 5th prop-pole in 28hrs.

Not because it needs 3 sticks. Not for different heights or because I broke any. NOooOo, I just keep loosing them 🐒

  "At the house" is coming off in favor of "up the drive" or I might skip it. The scrollwork has to go too .  I didn't even sand it, so lots of brush ridges making lettering HARD too. Like trying to write on a napkin on your stearing wheel, the mechanical pencil wanted to rip at the fresh acrylic paint.

 One small self serve sign, and some hanging "veggie of the day" signs too? I can fit Dill & Oats up top too; I just wanted to eyeball it all once with the camera for mistakes.  The roof is grey while I consider billboard art.  It will be an ad in the upper left (7up? The Vernors Gnome (right colors), Burma Shave joke, etc. et  & "closed" in the lower right; 25/75 diagnal seperating boarder between them.

IMG_20190518_025841~4IMG_20190518_025735~3IMG_20190518_043911~3

I think  needs red pink and blue for text &/or bullets/etc. for another "color pop".IMG_20190518_051156~2

Attachments

Images (4)
  • IMG_20190518_025841~4
  • IMG_20190518_025735~3
  • IMG_20190518_043911~3
  • IMG_20190518_051156~2
Mark Boyce posted:

Elliot, Mark - Don't wait too many years.   How right you are!!  None of us know how many years we have left where we can get around.  I am so sorry about your fall!  I hope you recover quickly.  I am well aware of the possibility of falling.  Since I had the damaged sciatic nerve in November, I have a drop toe where I have to really pay attention to my walking.  I have caught the toe of my shoe even on carpet.  So far I have only twisted the other knee that I have been getting the shots in to hold out a couple more years before a knee replacement.  However, I could easily go down and really tear something up.  We are getting our finances in order as forced retirement is coming to my wife as to me.  Once we start getting my Social Security checks, my wife's pension, and move around some investments, we should have a better idea of how to spend.  Right now we got caught a bit off guard and there isn't much coming in each month. 

Johan, The Altoona a car looks great!  The Horseshoe curve is only about 50 miles form where I live.

John, That is a great photograph of trains on your new track!

Mark. Thank you. That is a one place where i like visit some day.

Johan

Greetings all.

Nice to see all the great work on your layouts.

Paul- HORRAY! you found your problem. Glad a train finally made it all the way through.

Yardmaster- great looking train room. Very creative use of an old cistern.

Adriatic- very nice

Mark- sorry to hear about your current situation. Hope it all turns around soon.

Bill- Pick your heater first. Add that load plus 20 amps for lights and train power. Probably 30 Amps should be enough. Install a sub panel so you don't have to run back to the house to kill the power or re-set a breaker.

John- the new module looks great.

Mike G- nice work. The rail looks good painted. Enjoy the time with your family.

Johan- another nice box car.

Me? more yard work today. Finally sunny around here. Been raining so much I almost forgot what the sun looks like. I'm contemplating a change in my track plan going to my elevated loop....stay tuned.....

Bob

Last edited by RSJB18


                      yard day today...


                          outside though...


                             painting,  trimming,  & weeding...


                       OK, time for a beer...


                                 have a GREAT weekend everyone !!!


Attachments

Images (7)
  • mceclip0
  • mceclip1
  • mceclip2
  • mceclip3
  • mceclip4
  • mceclip5
  • mceclip6
Last edited by briansilvermustang

Don't you just hate it when reality punches your best plans in the nose?  The new home of the Bald Rock Mountain Railroad is 8 feet by 8 feet.  On the outside.  My existing 8x8 layout will not fit in a 7' 3" square room.  Along with the new territory there will be a totally new layout.  Seeking good 7x7 plans now.

As suggested I will pick a heater first.  There will be a local breaker panel along with power "E-stop" buttons.  I'm starting from scratch on interior overhead lighting.  I'm thinking LED's everywhere.

The Railroad CFO said the fence can wait for a couple days of rest.  See rule #1.  I think I'll run a switch engine while I wait for some 7x7 inspiration . 

Today, me, my wonderful wife Terry and my cat Pumpkin assembled the track for the inner loop around our to-be redesigned City scene. We are adding a 2-track industrial siding next to the zoo as well as a spur onto the city wharf, a stub track for switch engine storage and switches to allow trains to pass from the inner to the outer loop and back again at 2 points around the city to facilitate switching operations. Terry and I were both on the platform at different times assembling track and it was Pumpkin's job to rub against us and walk between our arms and legs as we knelt on all 4's doing our work. Pumpkin will be very disappointed when the layout is back together with full scenery and trains. Now, in its stripped-down form, the layout serves as Pumpkin's playground. Afterwards, we ate a bottle of Motrin and collapsed.

Guys everyone has so much great stuff going on 

Brian great yards very nice

Elliot. I also will be praying for you This September I’ll be driving 30yrs I’m 50 and had hip and knee trouble since my teens. I feel your pain 

Paul. I like that crossover and your layout is looking nice

Johan. Always enjoy your reefers cars I have  a soft spot for them

John. That’s a great pic of your layout 

Mike. Your layout is really coming together and thanks for the complement 


9185CF7A-3DAE-4F3B-A5A8-E69EBC884EBCE2023105-3589-4426-88BD-8D66B80511302A984292-43EF-4392-87D9-4E2CEB83F9F2B3FA0269-D441-4BAF-828F-D7E413C1439C00629F37-D7A3-46D8-8B93-DFB933A3B8A7D8864F16-274C-47C5-AD9F-D9F1EAD74B7B

Attachments

Images (6)
  • B3FA0269-D441-4BAF-828F-D7E413C1439C
  • 2A984292-43EF-4392-87D9-4E2CEB83F9F2
  • E2023105-3589-4426-88BD-8D66B8051130
  • 9185CF7A-3DAE-4F3B-A5A8-E69EBC884EBC
  • 00629F37-D7A3-46D8-8B93-DFB933A3B8A7
  • D8864F16-274C-47C5-AD9F-D9F1EAD74B7B
Videos (1)
DC79C7B6-2D8C-499B-916B-737761F7CFB8
Last edited by lee drennen

Add Reply

Post

OGR Publishing, Inc., 1310 Eastside Centre Ct, Suite 6, Mountain Home, AR 72653
800-980-OGRR (6477)
www.ogaugerr.com

×
×
×
×
Link copied to your clipboard.
×
×